I can count on one hand with several fingers left how many Windows Server workloads I’ve implemented. I build a lot of infrastructure that supports Windows Server workloads, but rarely involved in the actual configuration of Windows Server itself.
Requirements
Setup a Windows Server at OVH with SQL Server running in a Proxmox VM. This VM will use a routed network for internet access and nat through the Proxmox server when communicating with the OVH licensing server.
Painful discovery: SQL Server licenses from OVH cannot be used inside a VM. You must install the OVH baremtal SQL Server image in order for the SQL Server license to work. Clearly, that’s not the point of this article so you’re on your own for the SQL Server license.
Assumptions
- You’ve provisioned a baremetal server and have Proxmox installed
- You’ve purchased a Windows Server license from OVH
- You’ve installed Windows Server on a VM within Proxmox
- You’ve assigned a failover IP & mac address to your baremetal server
- You’re running Proxmox >= 6.1 (the dynamic network reload was introduced in this version). Rebooting should suffice on previous versions but your mileage may vary.
Consider this your todo list if any of the above haven’t been completed.
Proxmox configuration
Before we configure the Windows machine, we’ll setup proxmox to handle NAT. Check your /etc/network/interfaces file, it should look like the below example. Proxmox doesn’t edit to /etc/network/interfaces directly so we’ll copy it to /etc/network/interfaces.new.
auto lo
iface lo inet loopback

iface eno1 inet manual

iface eno2 inet manual

iface enx96f13d340d9c inet manual

auto vmbr0
iface vmbr0 inet static
	address 123.123.123.123/24
	gateway 123.123.123.254
	bridge-ports eno1
	bridge-stp off
	bridge-fd 0
	hwaddress xx:xx:xx:xx:xx:xx
Copy this file to cp /etc/network/interfaces{,new}, edit /etc/network/interfaces.new and append the following. This creates a new bridge with NAT support.
auto vmbr1
iface vmbr1 inet static
	address 10.10.10.1/24
	bridge-ports none
	bridge-stp off
	bridge-fd 0
	post-up   echo 1 > /proc/sys/net/ipv4/ip_forward
	post-up   iptables -t nat -A POSTROUTING -s '10.10.10.0/24' -o vmbr0 -j MASQUERADE
	post-down iptables -t nat -D POSTROUTING -s '10.10.10.0/24' -o vmbr0 -j MASQUERADE
	post-up   iptables -t raw -I PREROUTING -i fwbr+ -j CT --zone 1
	post-down iptables -t raw -D PREROUTING -i fwbr+ -j CT --zone 1
#NAT for Windows Activation
You now have three options to activate the new bridge.
- Using the Proxmox web interface navigate to Datacenter -> Server -> System -> Network and click ‘Apply Configuration’.
- Reboot the Proxmox server
- Use the CLI and run
pvesh set /nodes/<server>/network, replacewith your server name. If not sure, type pvesh set /nodes/ and press tab a couple of times. Don’t forget to append /network.
Windows VM Configuration
Navigate to Datacenter -> Server -> Windows VM -> Hardware. There are three approaches here based on the existing configuration.
Existing Network Interface (Routed)
If you already have a routed network interface (net0) using vmbr0 or you only want natted access perform the following:
- Add->Network Device. Set bridge to vmbr1. The mac address doesn’t matter for this internal interface so you can leave it on Auto. Enable the firewall or not, then click Add.
No Network Interfaces (Routed)
If your VM doesn’t have any interfaces you’re going to have to add two interfaces. One will be the routed OVH failover ip, the second the internal interface used for nat activation.
- Add->Network Device. Set bridge to vmbr0. The mac address is critical on this interface and can be found / assigned using the OVH IP manager. Enable the firewall or not, then click Add.
- Add->Network Device. Set bridge to vmbr1. The mac address doesn’t matter for this internal interface so you can leave it on Auto. Enable the firewall or not, then click Add.
Windows Configuration
You now have to configure the actual network interfaces within Window Server.
Routed
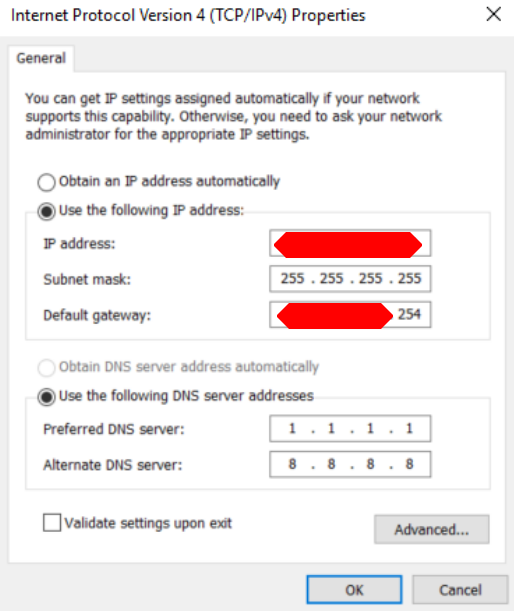
net0, or the first interface in Windows should be configured as follows in the IPv4 settings.

The IP address should be the failover IP which you assigned a MAC address. The subnet will always be 255.255.255.255 for failover ips, and the gateway is the first three octets of the physical server, the last octet will be 254. If the IP of the proxmox host is 123.123.123.123, the gateway for the net0 interface would be 123.123.123.254. Windows might warn you about subnets, just affirm the settings.
If you chose to only have nat access, follow the directions in the next step for net0.
NAT for Activation / Sole NAT
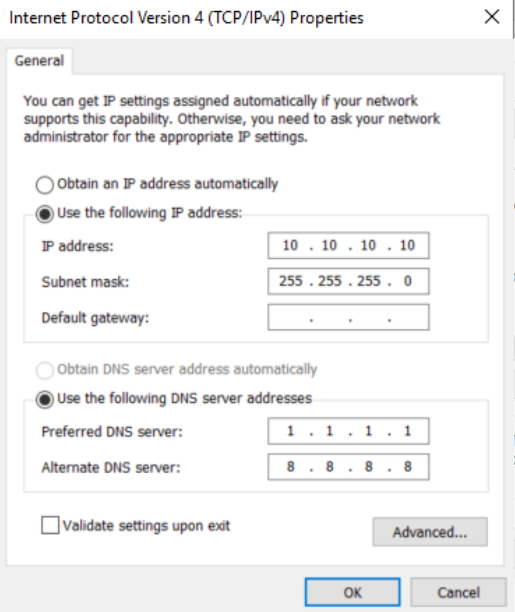
Next we configure the net1, or second interface in Windows. Use the following settings exactly as they are if you have a routed net0, add the default gateway 10.10.10.1 if you are using NAT only.

Static Route
The last configuration step is to add a static route for the OVH kms server (kms.ovh.net), the IP at the time of this writing is: 145.239.193.0. The -p in the route command will persist the route after reboots.
- Open up cmd.exe and run ipconfig /all
- Note the inerface # at the top of the output for your internal interface
- Run the following
route ADD -p 145.239.193.0 MASK 255.255.255.255 10.10.10.1 IF <interface number noted in previous step>
Activating Windows
OVH has a good howto located here, but the coles notes version is:
- Open cmd.exe
- Run
DISM.exe /Online /Set-Edition:ServerStandard /ProductKey:N69G4-B89J2-4G8F4-WWYCC-J464C /AcceptEula. Find a list of product keys here - Run
cscript.exe c:\windows\system32\slmgr.vbs -skms kms.ovh.net - Run
cscript.exe c:\windows\system32\slmgr.vbs -ato
With any luck, you’ve successfully licensed your Window Server. Please drop a comment below if you have any issues!